Woobox has some useful sweepstakes features for your business’s contest. The application is easy to set up and has a fan-only graphics page built in, or you can create one yourself to customize your campaign. Woobox is $29/month to use, and you unlock all of the Apps they have available with your subscription.
Sign up for Woobox
To get started using the Sweepstakes application, first go to the Woobox website. Then follow these steps:
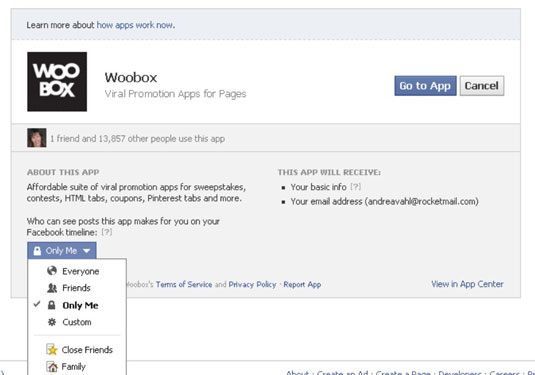
- Click the red Try It Now button.You’re taken to Facebook to connect the app. You may have to switch to your personal Profile. Again, don’t worry about authorizing the app from your personal Profile, because you get to choose which Page the app will be connected to.You may notice that the app has already selected who can see it. Make sure the App posts are visible to either Everyone or at minimum Friends rather than Only Me in the drop-down box shown.
- Click the blue Go to App button.
- On the next page, click Allow.You’re taken to the Woobox dashboard, where you can manage your free Woobox apps and your paid apps.
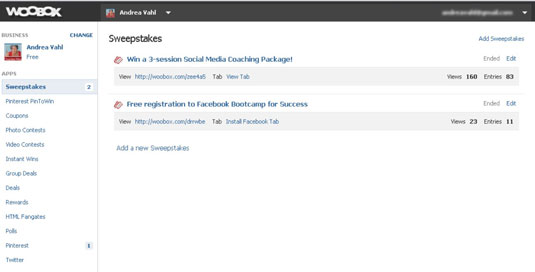
From this dashboard, you can add sweepstakes, coupons, and other products to any of the Pages you manage.
Add a sweepstakes
To add a sweepstakes, follow these steps:
- Click the Sweepstakes link on the left sidebar of the Woobox dashboard.
- Click the Add a Sweepstakes hyperlink.You’re taken to the page.
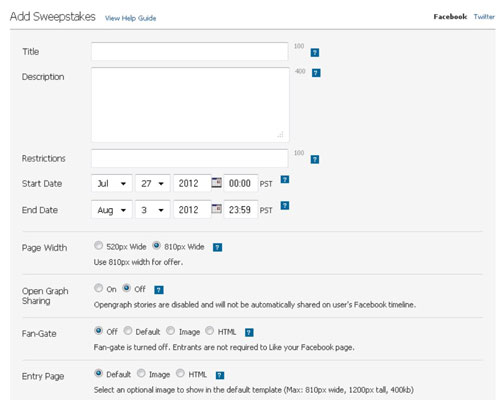
- Add your sweepstakes details.The following list details more information about each of the fields on that page:
- Title: Enter the title of your sweepstakes. The title can have a maximum 100 characters.
- Description: You have a maximum 255 characters to describe your offer.
- Restrictions: You may want to specify whether the rules call for one entry per person or one entry per person per day.
- Start Date and End Date: Enter the start and end dates of your sweepstakes.
- Page Width: Choose 810px Wide.
- Open Graph Sharing: This option posts a story on the user’s Timeline, saying that he or she entered the contest, but the user must authorize the app to do so, which may decrease the entries you receive.
- Fan-Gate: This option lets you allow people to enter your contest only after they like your Page — a good way to increase your likes. If you have a branded image, you can use it to tell people to click Like to enter. To enable this option, click the radio button next to one of the selections:
- Entry Page: Accept the Default setting to show the text details you enter for your contest. If you have a branded image that tells more about your contest, select the Image radio button, and upload your image. If you want to use HTML code to enter information about your contest, select the HTML radio button, and add your code.
- One Entry Per User: You can restrict the contest to one entry per user, one entry per day per user, one entry per Facebook Profile, or one entry per day per Facebook Profile by making a choice from the drop-down menu.
- Award Bonus Entries: You can reward people for sharing your contest by permitting extra entries for sharing. In the text box, enter the number of extra entries people will receive for sharing your contest, and from the drop-down menu, choose how you want to keep track of those entries.
- Post-Entry Page: You can upload a special image that appears after the person has entered your sweepstakes. This image must be a maximum 810 × 1200 pixels tall and no more than 400KB. You can encourage people to share your contest by checking Automatically Show Share Dialog Popup Window check box.
- Click the Save button at the bottom of the page.
Choose a payment plan
After you have your sweepstakes saved, you need to pay for a plan to enable the sweepstakes. Follow these steps:
- Click the Upgrade hyperlink at the bottom of the Sweepstakes form to choose a plan to pay for your sweepstakes.You’re taken to the outline of the plans. Most people need to select the Pro plan, which is the minimum required for a sweepstakes. If you need some of the other features or have more than 100,000 fans, you need the Pro100 or Pro250 plan.
- Select your plan.
- Click the Choose Account Level button at the bottom of the screen.The plan is saved.
- Click Billing on the left sidebar.
- Enter your credit-card information.You’ll be billed automatically for the monthly plan, so if you’re running a short contest, remember to stop your monthly plan when you’re done.
Add the sweepstakes to your Page
To add the sweepstakes to your Page, follow these steps fromWoobox:
- Click your name at the top of the Woobox site.You’re taken to the main dashboard.
- Click Sweepstakes on the left sidebar.Your sweepstakes are listed.
- Click the Install Facebook Tab hyperlink.You see the Facebook Page Tab & App Settings screen. This screen is where you manage your sweepstakes and see the statistics for your sweepstakes.
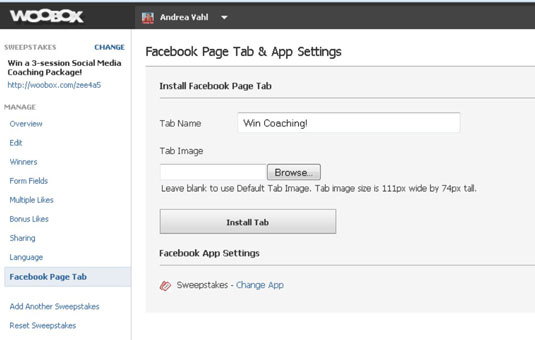
- Enter a name for your sweepstakes.
- Upload an image for your sweepstakes.
- Click Install Tab.
You selected the Page at the beginning of the process and should see the icon of the Page on which the tab will be installed at the top of the Woobox dashboard. If you need to change, click the Change hyperlink at the top of the Woobox page.
Your sweepstakes is now installed on your Page, and you can change the position of the app, as mentioned in the Wildfire steps previously.
ไม่มีความคิดเห็น:
แสดงความคิดเห็น
ท่านสามารถแสดงข้อคิดเห็นที่เหมือน หรือ แตกต่างได้ครับ ขอความกรุณาใช้ถ้อยคำที่สุภาพด้วยครับ ขอบคุณครับ